Thursday 29 September 2011

11 Weathered Vans

Hi Guy's

Here is my 10 NLKY's and 1 NLKF Vans all Weathered up. Not much to say but lots of work with the paint brush after the basic Air Brush Job. I will probably keep doing bits and pieces to these vans for a while. When you look at the full size pictures making the vans look about 3 times their size, it is easy to find bits that I missed or over shot with the paint brush. I tried to make each van as individual as I could without going too far off the overall theme. I have used the same camera setting and editing corrections with all these photo's, so this shows a differences.  

Cheers Justin Moy

Saturday 24 September 2011

NLKY Modifications

Hi Guy's

Before I weathered up my NLKY's, I did a few quick modifications to improve them. They are a great model as is but the main issue I had was coupler height. Greg Riddel showed me an easy way to lower the coupler height on these Vans. Firstly I add AR Kits bogies to all my stuff which did lower these vans a little. The bogies on them are good as is, but I put AR Kits or SEM bogies under all my stuff mainly to make every thing universal as I want the option of putting P88 wheels under it all one day when I can afford it. All the axle lengths from the big manufacturers vary so making it all standard makes sense to me. The other step to adjusting the couple height was to work on the coupler box. I trimmed up parts of a Kadee Coupler Box as seen in the following photo's. Anyway thanks Greg for the tip.
I trimmed off the bottom cross member.

Then trimmed up the top plate of a Kadee box and fitted it to line up when the screw hole
I then trimmed up the bottom plate of the Kadee coupler box to suit. I used the original Auscision Coupler as the new metal ones they have supplied seem to be pretty good. In this photo you can see one of the ILM brass steps that I fitted. I have sent Ian Storrie an email asking for more of these but I think his email has changed. So if any of you know his current email address, please let me know?

Another thing that I modified was the brake rodding. Photo's tell the story. I just straighten it up where it leads to the bogies. I just levered it out of the hole and then added a drop of super glue to hold the rodding in position. Auscision have bent it upward to give the bogies more room but I like to have them horizontal. It just improves the appearance to me and there is still plenty of room for the bogies.

On the brake cylinder side of the van there is a grab iron missing. To add this I just bent up a staple to suit and after drilling holes fitted it in position. This is only a problem with the type 1 Vans and the Grab Iron is in place on the Type 2 Vans


This last photo is just to show the great trouble that Auscision goes to with detail. I can't imagine sitting down and trying to scratch build this kind of detail. I am a fan and I don't mind telling people. 
I am just adding the finishing touches to all my vans so will post photo's soon.

Cheers Justin Moy


Friday 23 September 2011

NLKF18604

Hi Guy's

Just been doing a bit of work on 11 Auscision NLKY Vans. This one in the picture will be re-numbered to NLKF18604. I have photo's of this Van but I am not sure who the Author is so I can't put it up on this site atm. The weathering of this van pretty much follows what I have done with the NGPF hoppers. I used a light blue for the ends then hit the base colour with a mix of Grimy Black/Rust/Rail Brown. I have then worked on highlighting details with a paint brush. Anyway this is were I am at with this Van. All the Air Brush work is done on the others, just need to spend a few hours with the paint brush.

One of the original out of the box type 1 NLKY's
After new bogies, ILM brass Steps and a bit of paint.
There is a few other steps I have taken to prepare this model which I will detail later on when I have the other 10 at completion.

Cheers Justin Moy 

Thursday 15 September 2011

NLKF/NLKY project

Hi Guy's

For any of you that just got some of the New Auscision NLKF/NLKY type 1 Vans and are sitting their like me thinking of Idea's for Weathering, I just Scanned this Photo from my collection taken around 1998. It is a little after my era of modelling but I am sure the colours would be about the same for my era 1990/95.
I have already based the one that I had kit bashed some time ago on this colour scheme. I used as the base colour Floquil ATSF Red for my NLKY. I think that it worked well so I will continue with this on the 2 of the new ones I now have. The other 2 I will do in PTC blue. It is interesting that both the Red and Blue Vans in this shot have the R Logo on them. Anyway this is the van that I Kit Bashed before Auscision Annouced them.
 
Cheers Justin Moy

Sunday 11 September 2011

Auscision N Class

Hi Guy's

Just finished weathering a couple of Auscision N Class. They are real nice models and I think they are on Parr with the EL's that they did a couple of years ago. I have documented the weathering process so here we go.
These are the 2 N class straight out of the box. Nicely detailed but a paint job like this would of lasted a couple of days in service before the effects of weathering would be seen. I didn't want to weather them heavily at all. So I mostly worked on all the chassis area and a bit on the roof. Anyway there was a bit of work to do with the masking tape.

I had been looking at a way to mask a Vline logo and I don't know why I hadn't thought of this before. Simply cover the logo with tape and outline it with a texter. Then remove it onto glass and cut it out with a razor blade.

My main aim with this masking was to put a lighter grey on the loco body to fade the paint a bit. masking the logo means I don't need to replace it with a decal later. I used UP Harbour Mist Gray for the lighter shade of grey. I also did the bogies with my usual mix of grimes and darkened the roof while I was at it.

I also use a similar approach with the Vline Pass N class but I didn't want to do any weathering to the body as this scheme is relatively new and I haven't really seen any photo's of these heavily weathered as yet. So just the chassis and roof got a treatment.
The Vline pass N class also got another mask so that I could darken the area behind the side grills. After I painted this I removed the tape then cleaned the paint off the grill with a cotton bud soaked with turps.
After this I was at the stage that I masked up all the windows and put a little bit of a dusting around the pilots and got the brush out. I used a paint brush to high light details like the little lourvered panels of the side of the hood, the door locks, any little foot step holes and just about anywhere that dirt and grime can build up. I usually get a really wet mix of grimy black and turps on a brush and all I have to do is touch the area with the brush and the paint spreads out and covers the area. It usually dries in a few seconds or so and if it need more I just do it again. If it get too heavy I just dry the brush out and go in a soak up the excess before it drys. I also do this with the bogies usually with engine black and high light the springs, axle Journals and any wholes in the bogie. It makes a difference and give more depth to the models. The last thing is to cover the model with a dullcote and remove the tape from the windows.

Any here is the end results

Anyway this is my approach to weathering a pair of N Class loco's. They should look good on a Vline Pass set.

Cheers Justin Moy

Thursday 8 September 2011

Auscision NGPF Weathering

Hi Guy's

While weathering up the WHX, I also worked on an Auscision NGPF. This allowed me the photograph the Process. Photo's too me tell the story better than words. So here we go,

First I needed some photo's to work from. I took these at Taree around 2000. This is the one I based my weathering for the one that has been seen earlier on my blog.

Some end detail. This shows has the original blue ends have weathered over time.

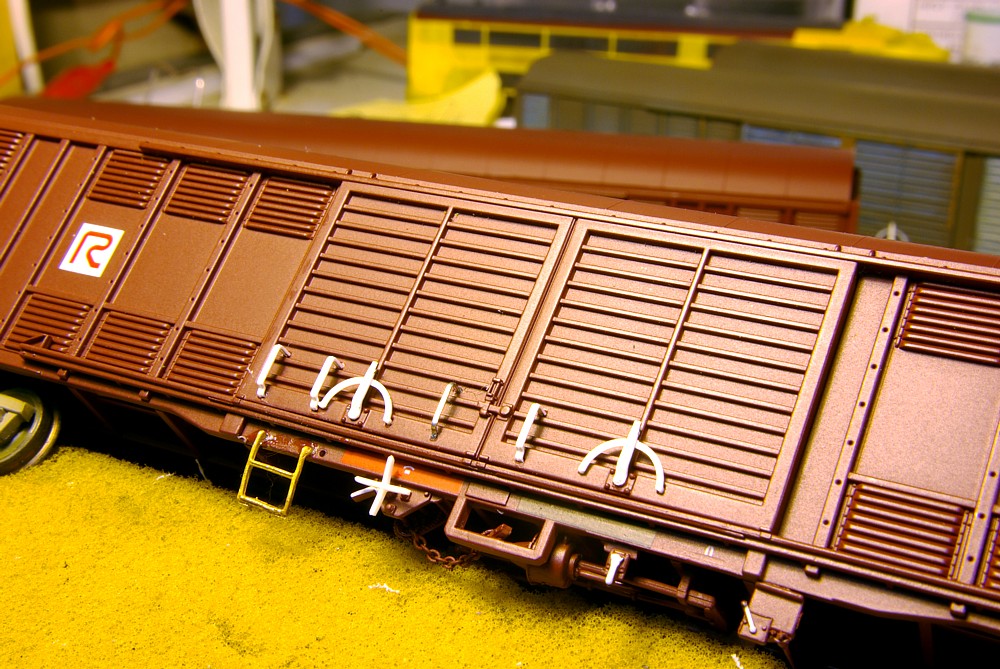
Firstly I replaced the side ladder. I have some that are broken so it was easier for me to do a standard replacement for all of them. This was done using an etch brass ladder, I think this one was from Model Etch in Victoria. I used the original ladder as the base and cut and bent this one to size.

The next step was to mask all the code boards and any little notices that I wanted to keep. I cut the tamiya tape to size on a piece of glass with a razer blade.

I then painted the top cat walk silver. I did tone it down a little by added a little bit of gray into the silver. At this stage I also put some grimy black around the Freight Rail logo. This was to represent a patch put on the wagon to give a clean surface for the transfer to be added

The next step was to mask off the cat walk and the area I wanted the patch to be. I then painted the blue over the ends and around the bogies. This is a light blue that I made up from a testers light blue mixed with a normal blue.
Once the blue was in place the model was to left for a few days to let the blue harden a little. leaving the masking tape on I then went about adding the overall colour that I wanted for the wagon. Same as the WHX, a mixture of Grimy Black, Rust and Rail Brown. I went over the bogies and the sides of the wagon but on the ends I just skimmed the outside edge and a bit around the end platforms where all the brake detail is.

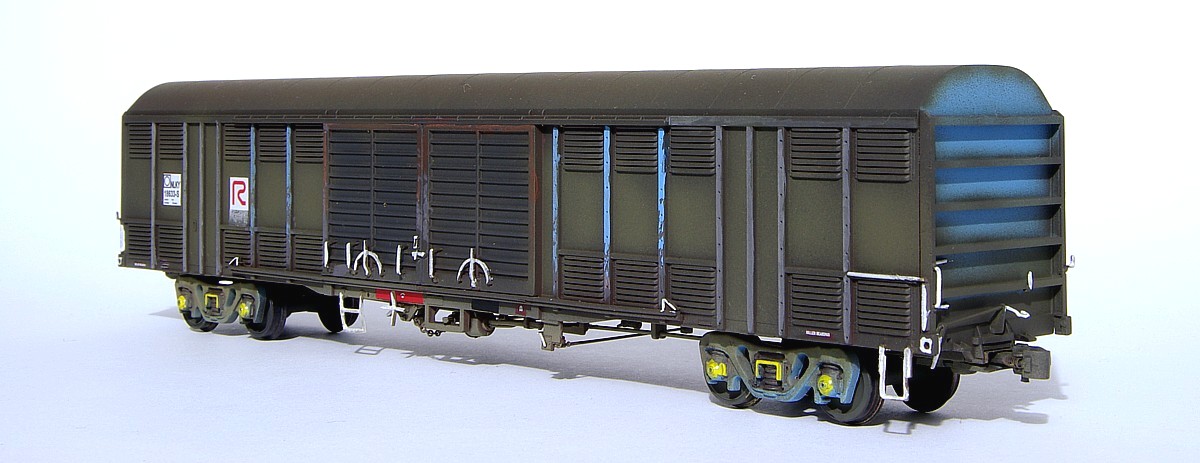
This is the stage that I am up to on this wagon atm with the tape removed. I still need to add the finishing touches. I let the blue set pretty hard so that I can wash over the bogies with turps on a brush to wash off some of the weathered brown to reveil the original bogie colour underneith. I usually get some rust out and put a light dusting over the cat walk with the Air Brush and also I bit around the body of the wagon. I also have hand brushed some detail on the side of the cat walk where the brackets are. I have hand brushed and highlighted much of the brake detail as well.
Anyway this was the result on the first one that I did. After repainting the steps and ladders back to white it finished up looking not too bad.
Cheers Justin Moy 

WHX photo

Hi Guy's

Had a request to see the photo/photo's that I based my weathering on for the WHX. I have some prints which I can't find right now but this is a digital I took around 2006 at Carrington. Although the wheat hopper has numerous modifications it was still a good base for the colour palet needed for the weathering.
Although the details on the wagon have changed over time, the weathered brown has been with this wagon for many years.

Cheers Justin Moy

Tuesday 6 September 2011

Austrains WHX

Hi Guy's

Just been working on a whole heap of stuff. This Austrains WHX is one of them. Just thought to document the weathering process as I try to document everything that I am doing from now on.

 The Process started with masking off the top walk way, Code Board and the R logo. I just cut the Tamiya masking tape to size on a piece of glass with a razor blade.

I then added the overall colour that I was after. This is a mix of Floquil Grimy Black and Rust and then lightened with some Rail Brown.

Once I had the right mix of colour from working off photo's I then got the brush out and started to paint and highlight all the details. From looking at photo's things like the steps no matter how weathered the wagon is were always painted white. many other details were also highlighted. Anyway the end result is a wheat wagon that looks like it is in Service
Cheers Justin Moy